
I am SO excited to share this with you! I actually worked on this little project back in December but am just now getting around to posting it. Forgive me.
I have seen this kind of baseball stitching on a wall all over Pinterest for months. I pinned a BUNCH of pictures but none of them seemed to have any good tips on how to DIY this little project. I will admit I even looked into purchasing vinyl decals but they were SO expensive I just couldn’t bring myself to pull the trigger. But I knew I wanted to decorate Buddy’s “big boy” room in baseball/Cardinals decor and this would be the perfect touch. Lucky for me, I had also seen a friend from college post pictures of her child’s nursery on facebook and she had the baseball stitching on the wall! After many facebook conversations back in forth also involving her friend who did the actual painting (thanks ladies!!) my husband and I devised a plan to get the look we were going for. Here’s what you’ll need.
Supplies:
paint–a creamy white for the walls if you want, I then got sample sizes of a light/medium grey (Valspar Steel) and a deep red (Valspar Cut Ruby)
brushes–I used a 1/2″ artist brush I found at Michael’s for a couple bucks with a coupon. I was glad to have a decent quality brush.
broom handle (can still be attached to the broom…I actually used a paint roller extension rod)
pencil
something to make a stencil & a spacer with (see below)
Ok…stay with me. I’m hoping I can explain it well! Feel free to ask questions in the comments.
Step 1: Decide how far into your wall you want your stitching to extend. This is going to vary for each room since walls are different heights, lengths, etc…it helps to have 2 people for this part so you can get a decent idea. Once you figure that out, measure from the corner of the wall to where your stitching will be. Measure that same distance on your broom handle. Tape the pencil to the broom handle (or whatever you’re using) at that point. Put the end of the broom handle that does not have the pencil in the corner of the wall, swing the pencil end (applying light pressure) from the ceiling around to the adjacent wall so you have a pencil line showing where your stitching will be. Stop & repeat for the other corner you want stitching around. (Sorry I don’t have any pictures of this part!)
Step 2: Paint over your pencil lines with grey paint. I did 2 coats. Btw…you could definitely use tan or any other color for that matter.


Step 3: While your arches are drying, prepare your stencil & spacer. (If you don’t need a stencil & spacer you probably don’t need this tutorial…just sayin.) 😉 I used the black chevron divider that came with an old 3-ring binder as my stencil. It had the perfect natural angle. If you don’t have this, you can make your own but I would recommend using something that you can easily wipe paint off of as you are going to get a lot on it & won’t want to make random red blotches all over. Be sure to wipe your template after each chevron to avoid this. Anyway, I cut it down so my stitches would be 3″ from center of the chevron to outer edge. Then I cut a chunk of a cereal box so I had an easy 3″ spacer to easily space my stitches out 3″ apart. This worked well for me. You may choose to alter this to fit your needs. When your arches are dry you’re ready to start stitching!

Step 4: Stitches. I found it easiest to start from the outer edge and swoop inwards. This gave me a cleaner edge on the outside as I was able to overlap lines in the center of the chevron. Try not to use too much paint. It’s hard to resist but use a thin coat. I ended up using 2 coats, and probably could have done a third, but decided they didn’t really need it. After you paint each chevron, remove the template, wipe it clean, & line up your spacer.
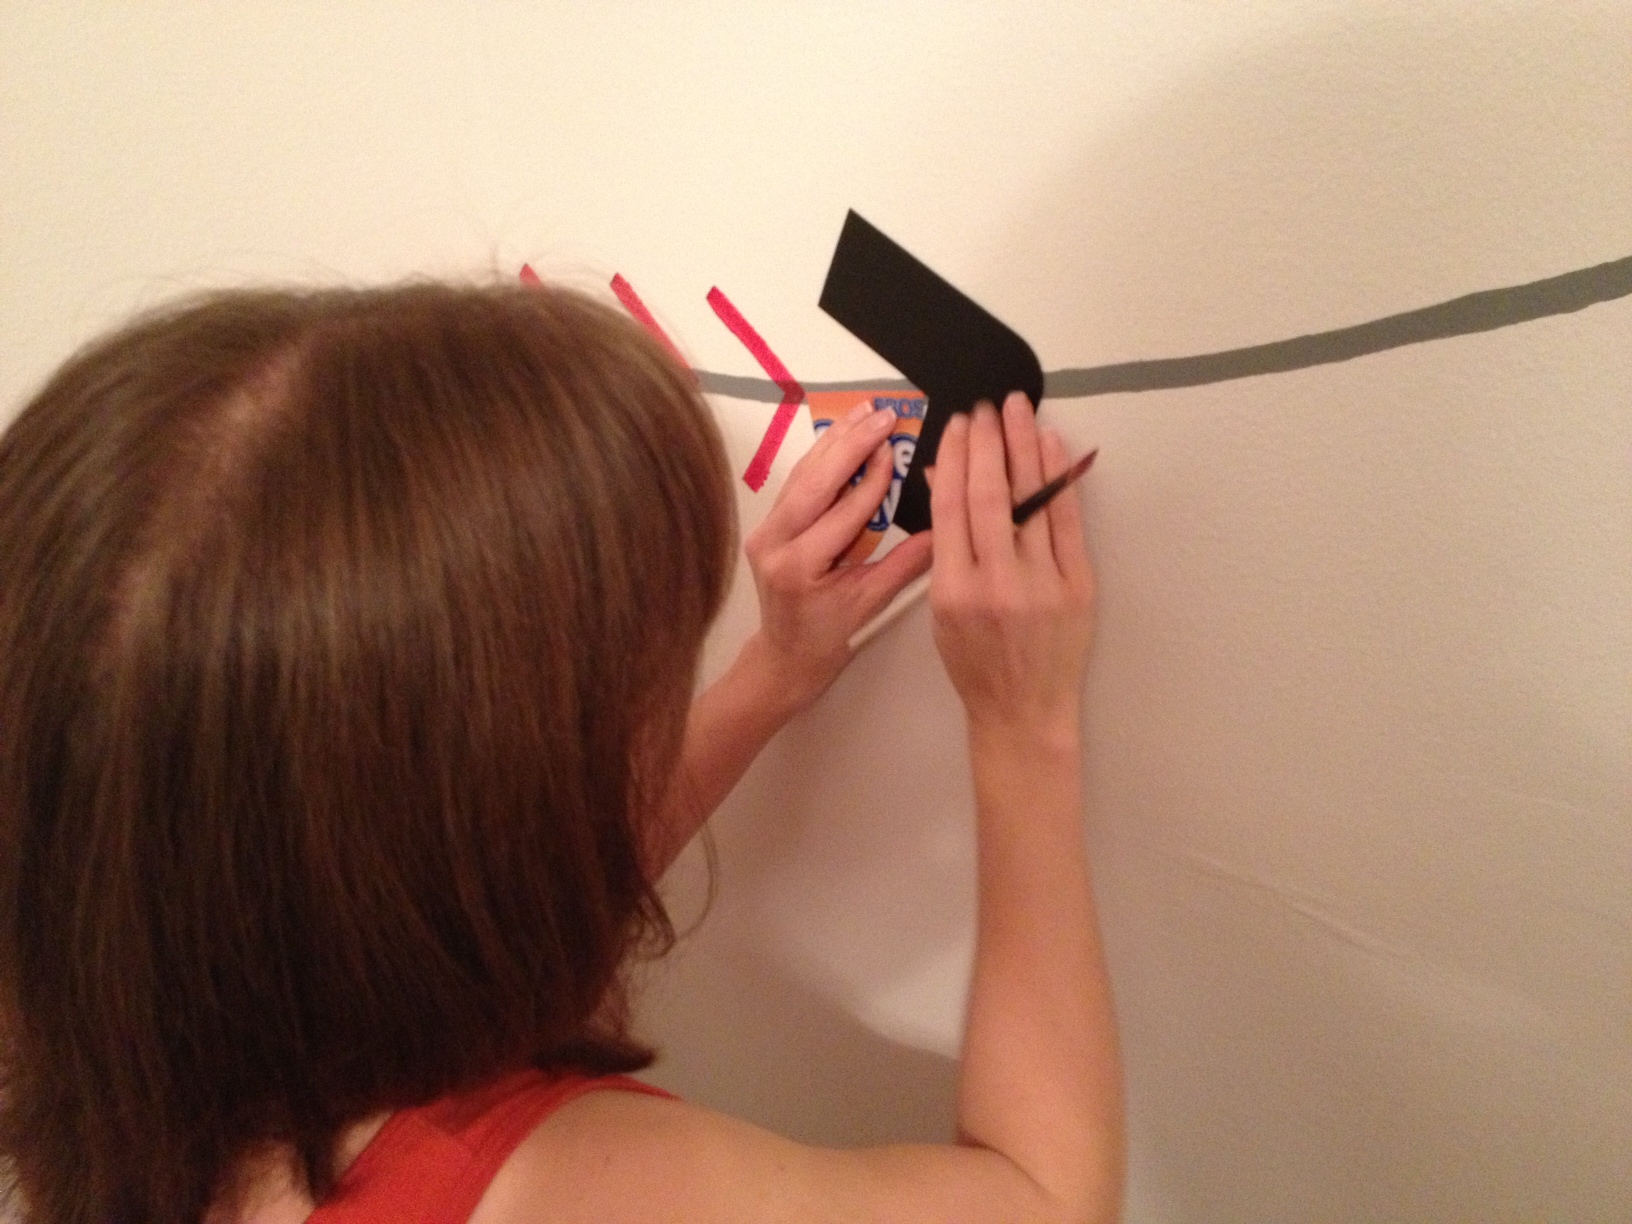
See my 3″ hunk of cardboard in my left hand? Man did that come in handy. No need to eyeball. I’m too much of a perfectionist for that. Touch one end of your spacer to the chevron you just painted (be careful if you get it in the wet paint), adjust so it follows the curve of your arch, and place the template at the other end. Sometimes I had to adjust the angle of my template once I took the spacer down to get it just right. Paint the next chevron & repeat.

See how it’s starting to come together? Don’t worry…you’re almost there! Once you get a coat of paint up, let it dry completely and you will likely be able to freehand the second coat without much trouble. Might I suggest eating a snack before so you don’t have shaky hands? If you would like a third coat (or more) go for it! Paint until your heart is completely content. Then step back and enjoy what you just accomplished!

I still can’t believe how quick and easy this project was. I think expected it to take me several days but I did it in less than 2 naps. Bingo. Done. Now THAT’S the kind of impact DIY I like to do! 🙂

The best part has been watching how much Buddy loves it. Months later he still drags visitors upstairs to see his baseball big boy room. (Say that 5 times fast.) It makes me so happy to know that he loves it so much. I’m still working on a few more DIY decor ideas for this room so stay tuned as I wrap those up and share them. And then…then I get to work on a nursery! Wahoo! Nothin’ like a good home project to get the blood pumping. 😉
What DIY projects are you working on around your home?

Great idea and just in time for spring training!
Love this! My husband and I were searching for a good tutorial on how to do this 🙂 Thanks!
I was disappointed when I didn’t find any real tutorials either. After a little brainstorming, we came up with this method. When it worked, I knew I had to post one! Glad you found it!
This is awesome! It would look so awesome in my son’s room. Thanks for sharing!!
You’re welcome Tricia! We love it…just the right amount of something fun without going too overboard! Good luck!
Love this!! Thanks so much for sharing!
Thank you! Glad you love it!
Pingback: DIY Burlap Door Wreath | Gaining Mommymentum
My son just asked for baseball stitching on his walls in our new house> Lauren to the rescue! I was going to try to freehand, or template arch, or … didn’t know what! Love your idea with the broomstick. Will it only work from the corners? Am going to try more top to bottom…
I don’t see why you couldn’t stick the broom handle anywhere along the outside of the wall & make the arches however/wherever you want. So glad you found our tutorial! Good luck! (Feel free to send a pic when you’re finished! I’d love to see it!)
I love it! My son is turning 6 in a few days so we’re in the process of re-doing his room with a baseball theme. This tutorial is great!
Thanks Sadie! Good luck! Let me know if you have any questions.
TY SO MUCH for this tutorial!! My son wants an orange and blue Detroit tigers room but after seeing this I’m going to do the orange and blue on the walls and this baseball stitching on the ceiling!!
You’re welcome Krista! I hope you’ll come back & tell me how it went on the ceiling!
How long are the lines of your stitches (the chevron angle)??
Meghan, they are 3 inches from the center point. Hope that helps!
Your step by step instructions made it so easy to do! Even easier, I found Sharpie paint markers that made it super easy as I was afraid I wouldn’t get the crisp clean lines I was hoping for with the stitching. Thanks so much for taking the time to post this.
Thanks Lindsay! Glad the project went so well for you! Enjoy showing it off. 🙂
OMG! I’m absolutely thrilled to find this! I almost bought the vinyl ones, but money just held me off and was disappointed I couldn’t do this for my son who absolutely loves baseball…this is Great!
You are so welcome Hilda! I was bummed I couldn’t find a good tutorial when I did mine so I figured it was about time. Hope it is helpful for you!
Did you cut your chevron angle (binder insert) to a specific length?
Hi Carolyn! I cut it down to 3″ from the center point of the binder insert. Hope that helps!
What is measurement at the closest points of the arches? I’m trying to decide how big to make the curves! Thank you! 🙂
I can measure the arch tomorrow (little man is sleeping in there right now!) but it’s really going to depend on the size of your wall. If your wall is bigger or smaller than mine, you’ll want to adjust! My best advice is to grab a broom, stick the handle up in the corner of the room, & tape a pencil to it at the other end. Lightly draw your arches then step back & see what you think of the placement. Need to adjust? Erase your markings, move the pencil, & repeat!
How much time overall did you spend on this little project?
Just a few hours. I think it took me 2 naps to accomplish so somewhere in the 2-4 hour range.
I am having a hard time finding a binder insert to use for chevron shape. Can you explain that a bit more, or think of an alternative?
Anything with a nice 90 degree angle (that you don’t mind getting paint on) will work great! By binder insert, I mean it’s the plastic piece that is inside of many larger binders when you buy them. Try a 3″ or 4″ binder (can even just go take a peek in the binders at WalMart or wherever to get an idea & then see what you might be able to come up with. Good luck!
Hi Lauren!!! I have been telling my son for a year now that I was going to put baseball stitching on his wall!! He turns 6 on Wed and I am just now trying to get it done! 😳 Thanks for the tutorial! For your arches, how did you get the line edging so straight? The edging on mine is looking very uneven when you get up close. Yours looks like so clean. I haven’t got to the red stitching yet. I don’t want it to look too elementary. Any suggestions for this Type A??
It’s worth spending a little money on a nice brush! I went to Michael’s and bought a nice art brush to do my stripes. I think my brush was $7 or $8…worth every penny!! Good luck!
Do you remember the color you painted the wall? You said a creamy white but I like what you used and was wondering what it was called
Thanks
Hi Vicki! I don’t remember the exact name but I remember it had “popcorn” in the title if that helps any.
Hi! The stitches on a curve will make the gaps on the left side closer and right side wider. If you align the template up on both sides with the chevron it will not curve. How do you keep the gaps even on both sides? Thank you!
Hi Greg! Very simply put, you don’t! It’s ok for the gaps to be uneven. That’s the natural look so try not to let it bother you!
Pingback: Baseball Wall and Boy's Bedroom Makeover -Part 1 - In Between Moderation
Attempting this wall….white is dried now onto the arcs and stitching! Thank you so much for your tutorial!
Good luck, Janel!
Thanks so much for this idea! At first I tried to tie a pencil to a piece of yarn and tape the end to the wall…I quickly figured out that wasn’t going to work because yarn is stretchy…..I tried string next…I still wasn’t happy with it. I’m so glad I found your broomstick idea! I did it on the wall before we painted to I could figure out how large to make the arcs…..it was SO EASY!!! I haven’t painted it yet so I’m hoping when I go over it with a brush it’ll look as smooth and as amazing as yours does!! 🙂
You’re very welcome! Good luck finishing your project!
Doing this ASAP!! Thank you!!
I did have a question about the first step. I think I may need some more details on how exactly to use the broom
Start with the broom handle flat against the ceiling with one end in the corner of the room. Hold the end that is in the corner in place while you swing the other end (with attached pencil) down and across the wall to where the two walls meet. That creates your arc. Hope that helps!